First of all, no. I'm not dead. I've actually done many, many projects in the last ten months since I've posted to the Green Room. But it was summer, and we bought a boat. Then it was football season and then it was the holidays and well......Time got away from me. Here's what I'm working on now, and we'll backtrack to all of the other projects. K? OK!
It all started last year with a piece of Trina Turk outdoor fabric:
While completely gorgeous, this is pricey! And being the cheap girl that I am, it is sadly unattainable. But the color combination stuck with me. Because we were knee deep in Barbie Dream Home notions, I searched for viable alternatives.
Here's what I came up with. A navy/white piece from One King's Lane, Navy Velvet, Cat's Cradle by Robert Allen and Magic Carpet by Waverly. Somewhere along the way, the Barbie Dream House was put on hold. So the palette was left to modernize the Green Room.
An idea started forming. I wanted to make the room a guest room/project room/office for me. I wanted to make the existing twin bed look more like a sofa with an upholstered headboard. Then the other side of the room would make way for my office. Google images brought me this image of kind of what I'm looking for in a bed situation.
Similar colors? Check! The addition of underbed storage? Score! Turns out, my dad's neighbor is a finish carpenter who is going to build me a similar bed for only the cost of the materials!!!! Rock on, Dad's neighbor!
Meanwhile, I decided on how to make my desk. I thought a Habitat door would be a great desk top option. Plus, I'd be upcycling something, and it made my heart feel all warm. Two Helmer files would be the base of one side and a Lowe's clearance wall cabinet became the other side.
And here she is! It actually turned out better than I imagined. A happy accident is how the doorknob hole is a great place for power cords so the desk can sit flush against the wall.
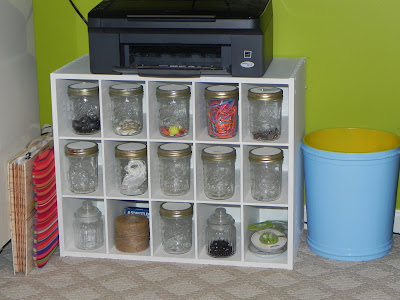
I hate, hate, hate having the ugly printer on the desktop. I repurposed a shoe cubby into a printer stand under the desk. Mason jars I've emptied became great storage for sorted buttons, upholstery nails, even rubber bands. The trash can used to be Waverly black/white toile. I painted inside sun yellow and the outside sky blue. Love how it turned out.
My pin board used to be painted black. Black/white houndstooth fabric covered it. (I went though a houndstooth phase there for a while). A coat of gloss navy and some navy/white ticking give it a fresh outlook.
Pixar here I picked up at the Goodwill on discount day. I gave him a nice coat of gloss sun yellow.
Pullo did not know what to make of all of the activity going on. He kept a respectful distance.
This was an unfinished wall cabinet I picked up on clearance at Lowe's. Several coats of high gloss white later, it's the right side base of my desk.
It's the perfect hiding place for my photo paper, copy paper, binders and my cameras.
Little turquoise Buddha was a Target clearance purchase.
I already had two Closetmaid shelving units. I put contact paper on foam core to make a wallpaper effect on the back. Love the graphic pattern.
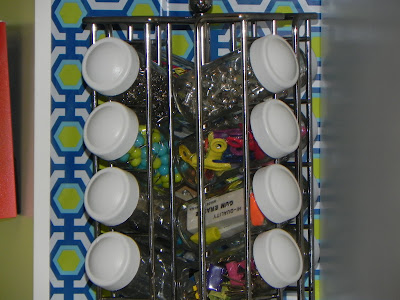
Pinterest turned me on to turning an old spice rack into a supply organizer. A quick spritz of spray paint on the lids is all it took.
Papyrus cards and an internet truism are hung on the end of the shelves. Target clearance frames are painted Lobster Red.
Hopefully, this isn't true. But the card was too cute to pass up.
Another Papyrus card.
And no, truer words were never uttered. Unfortunately.
Stay tuned for the second side of the room and all of the other projects that have been occupying my last year.
green room
Sunday, February 19, 2012
Sunday, April 10, 2011
Raising the Bar...er, Rod + Epic Fail
Ever have an idea that you think is incredible? Seriously, like it's the best idea you've ever had? Ever?
Yeah, me, too. That idea for me was to customize Ikea Ritva curtains for the TV room. It started off easily enough. Lovey had to travel to Salt Lake where he purchased me two sets of 98" white Ritvas. Easy!
I had previously bought 3+ yards of Thom Filicia for Kravet fabric from the clearance section of Hancock. Easy!
I thought it would be the perfect accent for the curtain border. So I sat down with my sharpest scissors and got to work.
Here's what I didn't anticipate.
To create borders for two sets of curtains, one must cut eight identical 98" strips of fabric.
One must then fold under each side to the fabric to produce a straight edge and iron.
One must then fold the fabric in half and create one long 98' strip of fabric.
Multiply the above process by 8.
Seven (or so) packages of Heat and Bond later, the curtains were complete!
Then came the process of raising the curtain rods to accommodate the new 96" length (2" hem, natch). No home improvement process has ever gone smoothly in this house. Due to random placement of studs (or lack thereof), things aren't always smooth. This curtain rod raising was no exception.
The first screw I put in went straight through drywall. A massive anchor didn't help. After a few choice $&^$*)&!!! words, I went on to the other brackets - which went in smoothly - until I reached the next to last. Here's where we hit some sort of - something - that prevented the screw from going in all the way. *^%$&*^*&^*&^!!!!!!!!! This is where Lovey stepped in and saved the day. He used his massive brute strength to not only get the remainder of the brackets up, he probably kept me from throwing a hammer through a wall.
At long last, here is the final reveal.
Crappy picture due to crappy weather last week.
And a detail shot:
I have never been so glad that a project is complete. And I do love them now although it was touch and go there for a while.
~~~~~~~~~~~~~~~~~~~~~~~~~~~~~~~~~~~~~~~~~~~~~~~~~~~~~~~~~~~~~
And now, I'm not too proud to admit when I have failed. And this project failed epically.
Remember the cheap craigslist lamps? The ones I decided to silver leaf? Well.....that shizz is hard! Especially on a textured surface.
Out of impatience, I tried to use chrome spray paint.
Isn't it funny how "chrome" is less "shiny" and more "dull, fake looking silver"?
Hello, Kilz primer spray!
1000 times better already. Hmmm, maybe this is how they should stay. Hmmmm.
Saturday, March 12, 2011
A Happy Accident
Last year, my Grandfather turned 95. My mom, her brother, her sister and I planned an awesome party for him. Printed invitations, catered with good country food - fried chicken, macaroni and cheese, a yummy, yummy homemade cake. I decided that we needed deviled eggs. My aunt and I agreed to make them - enough for 100 people. That meant boiling and peeling four dozeen eggs each. What I didn't forsee is how long it takes to peel 48 hard-boiled eggs. Not a fun way to spend a Friday night, for certain. By the time I shelled Egg #48, I was exhausted.
I've been seeing Union Jack pillows everywhere.
Ballard Designs $71
Etsy $61
Another etsy. Can't recall the price.
First dibs. Too mortified at the price!
I remembered that at some point, I had bought some t-shirt transfer paper for printers. A quick google search brought me to the union jack I used.
I grabbed a piece of linen I had lying around and sprinted to the Rowenta!
Hmmmm. At first, I was chagrined at the outcome. Then then more I looked at it, I loved it. No, I loooooooved it.
I'm not sure I would have loved her as well if she'd been perfect. She looks like she's been through it. Just like my cousins in the Royal Family.
Another happy accident.
I dumped the yolks in a ziploc bag and put them in the fridge. The next morning, I dumped about a half a jar of mayonaisse (Dukes, naturally) in the bag. Then I grabbed a bag of bacon pieces and the jar of parmesan. I poured it all in the ziploc back, zipped it closed and kneaded it until it was the right consistency. When I tasted the concoction, WOW! It tasted amazing! What a happy accident! Those eggs won rave reviews, and I probably could have eaten an entire dozen of them myself. What a happy accident!
I tell you that story to tell you this story.
I've been seeing Union Jack pillows everywhere.
Ballard Designs $71
Etsy $61
Another etsy. Can't recall the price.
First dibs. Too mortified at the price!
I remembered that at some point, I had bought some t-shirt transfer paper for printers. A quick google search brought me to the union jack I used.
I grabbed a piece of linen I had lying around and sprinted to the Rowenta!
Hmmmm. At first, I was chagrined at the outcome. Then then more I looked at it, I loved it. No, I loooooooved it.
I'm not sure I would have loved her as well if she'd been perfect. She looks like she's been through it. Just like my cousins in the Royal Family.
Another happy accident.
Sunday, March 6, 2011
Master Gallery Wall
I finally got around to installing the gallery wall in our master bedroom yesterday. The real world has kept me pretty busy lately.
The starting point was this $10 thrift store mirror I painted a peacock blue. To that I added a $5 wooden crown I found at Marshalls. I lined a gold Goodwill frame with a swatch of natural linen and framed two bluebird feathers I found in the backyard. The framed print is a photograph of a clover-covered light pole on the Battery in downtown Charleston.
From there, I just started adding.....and adding....and yeah, adding.
And here it is completed.
Yes, that is the Beetlejuice chair covered in the bed shams. It's the next big project. I just love that the wall is covered in found items, photos of places we've been and prints that I've carried around with me for years. And yes, it's driving me crazy that the little gold bird print is a little crooked in the picture. It's straight now, promise.
Saturday, February 12, 2011
Sham Wow!
Monday, January 31, 2011
Subscribe to:
Posts (Atom)